
A Seated Buffet Dinner for 16
Planning and "doing ahead" is the secret to hosting a large group
This holiday season I committed to hosting a dinner for sixteen. It’s been a while since we set up our large dinner table in the guest house behind our home and trotted food back there for a large group. Planning would be the key. So I set about some truly manic list making to define every single task that could be done ahead of time.
I wanted a self-serve buffet that would please just about everyone. I settled on this as the menu:
Appetizers with cocktails

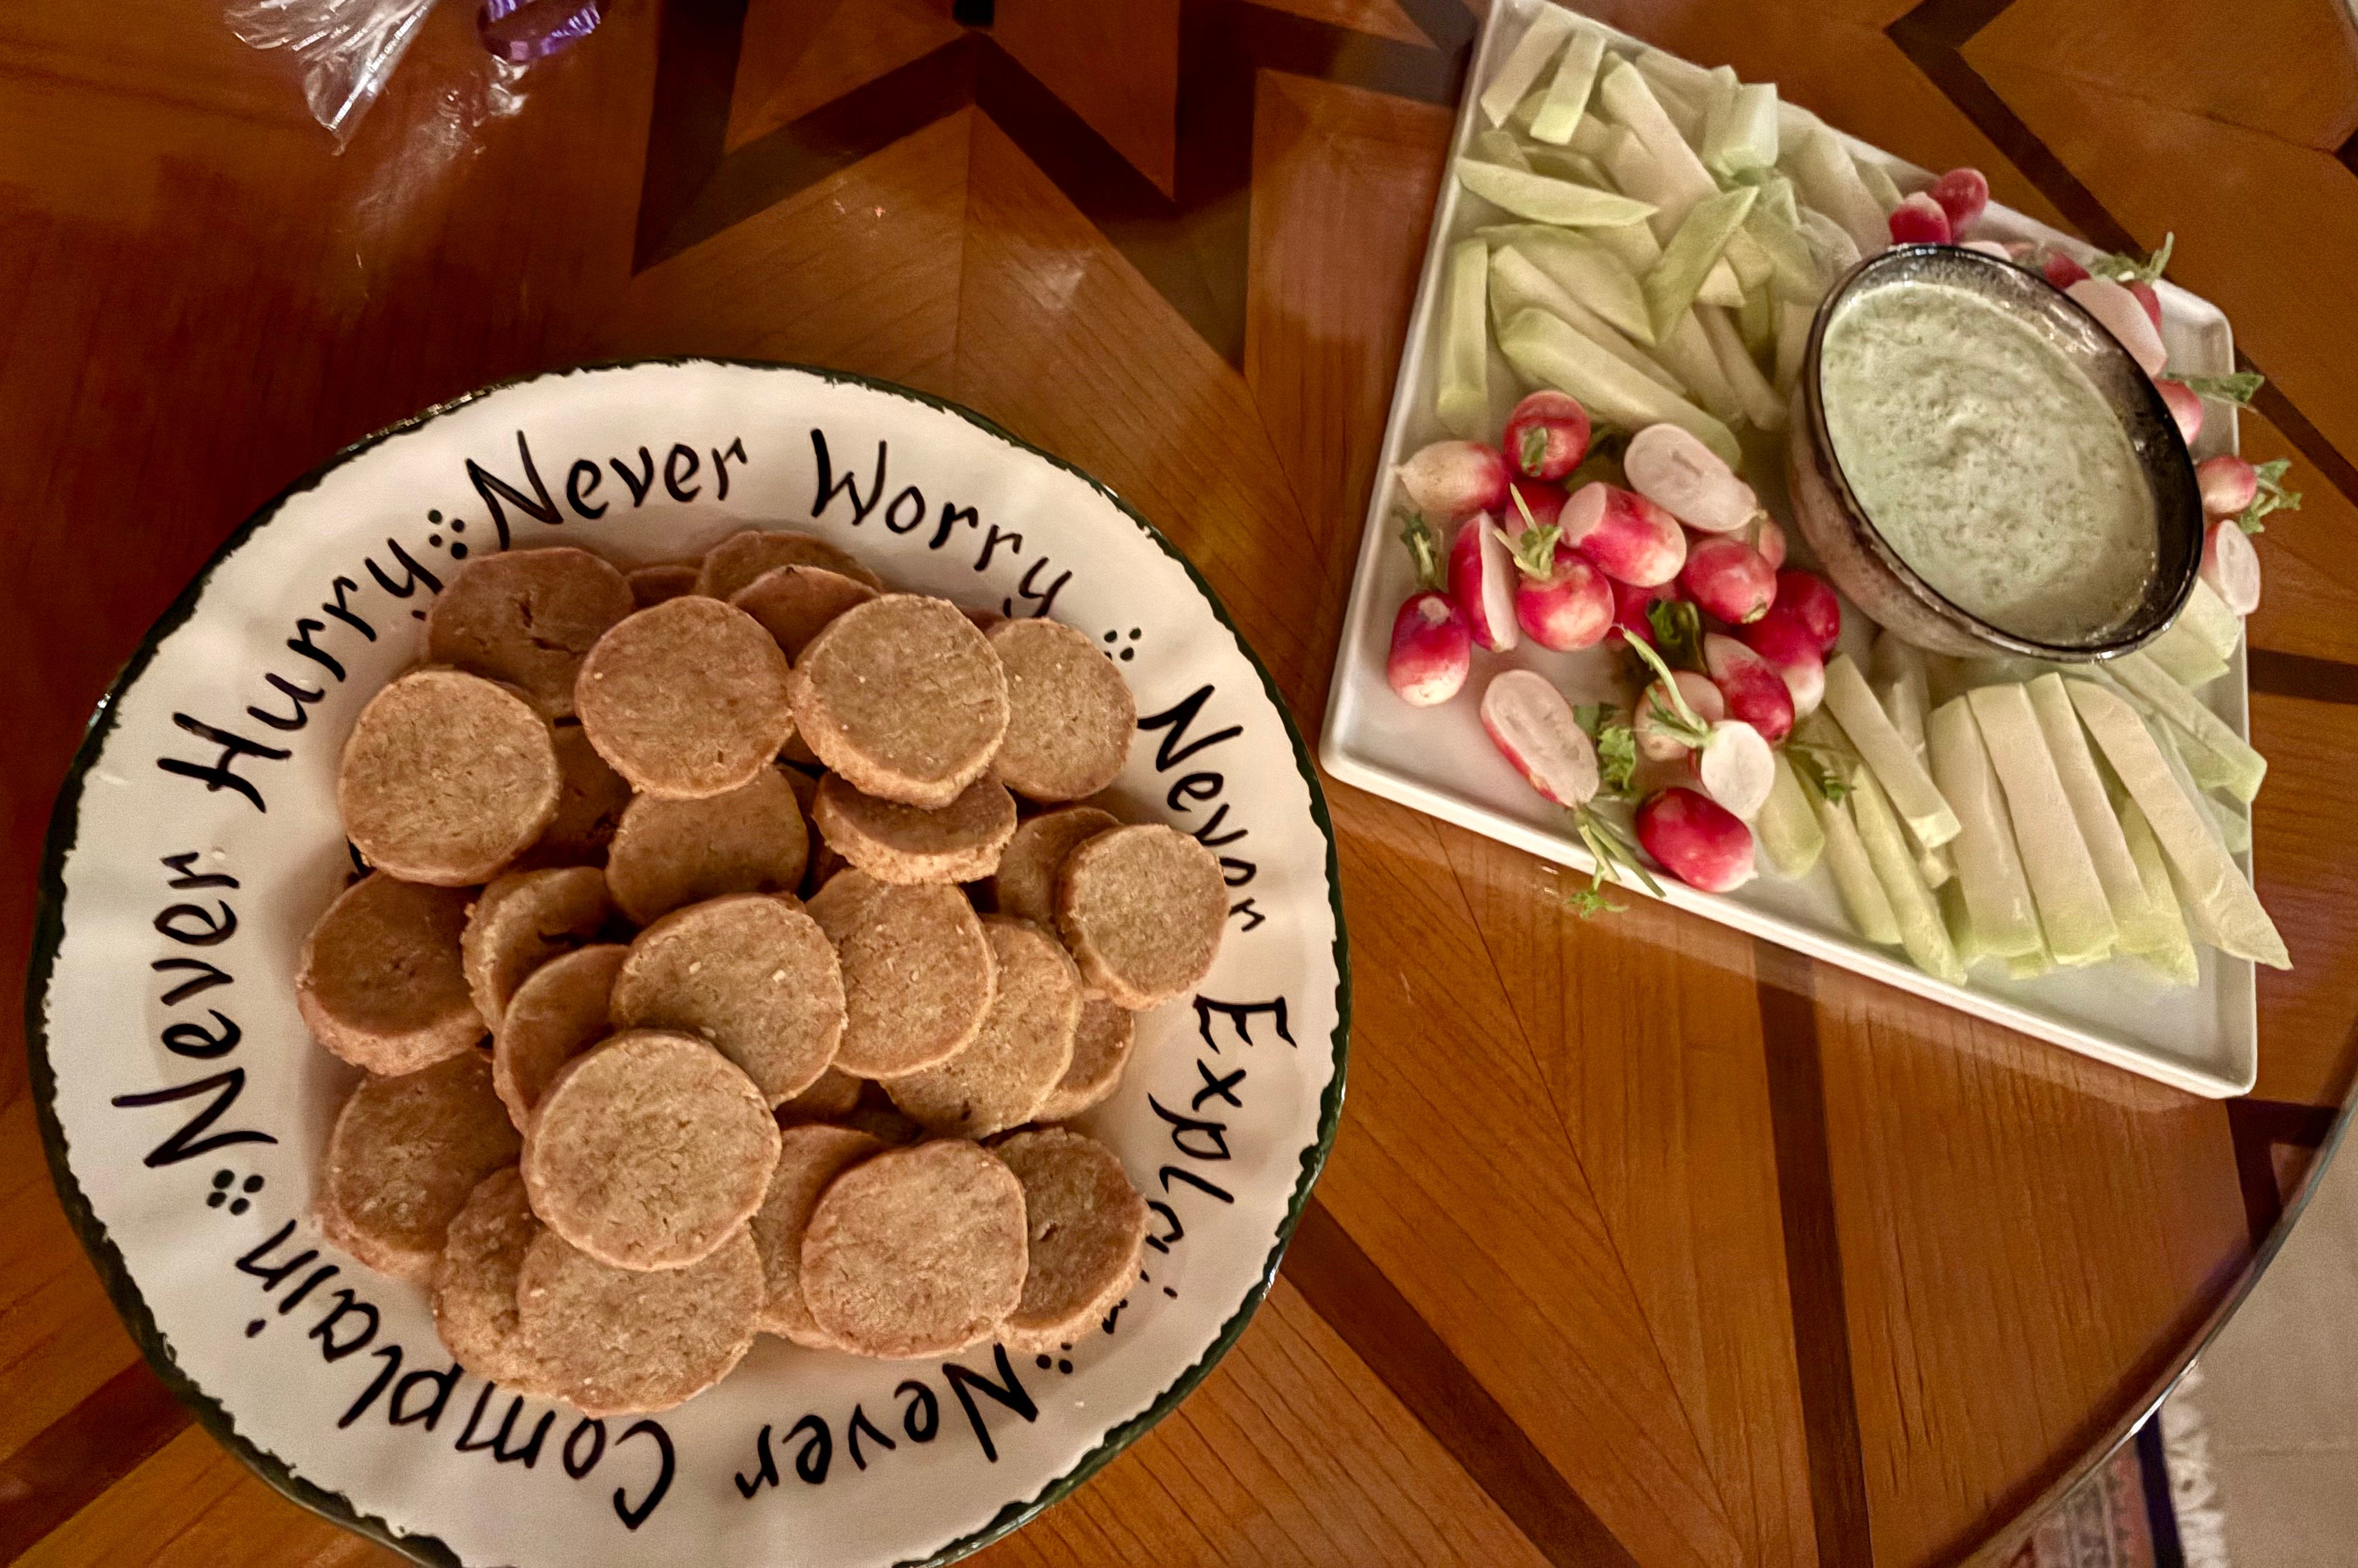
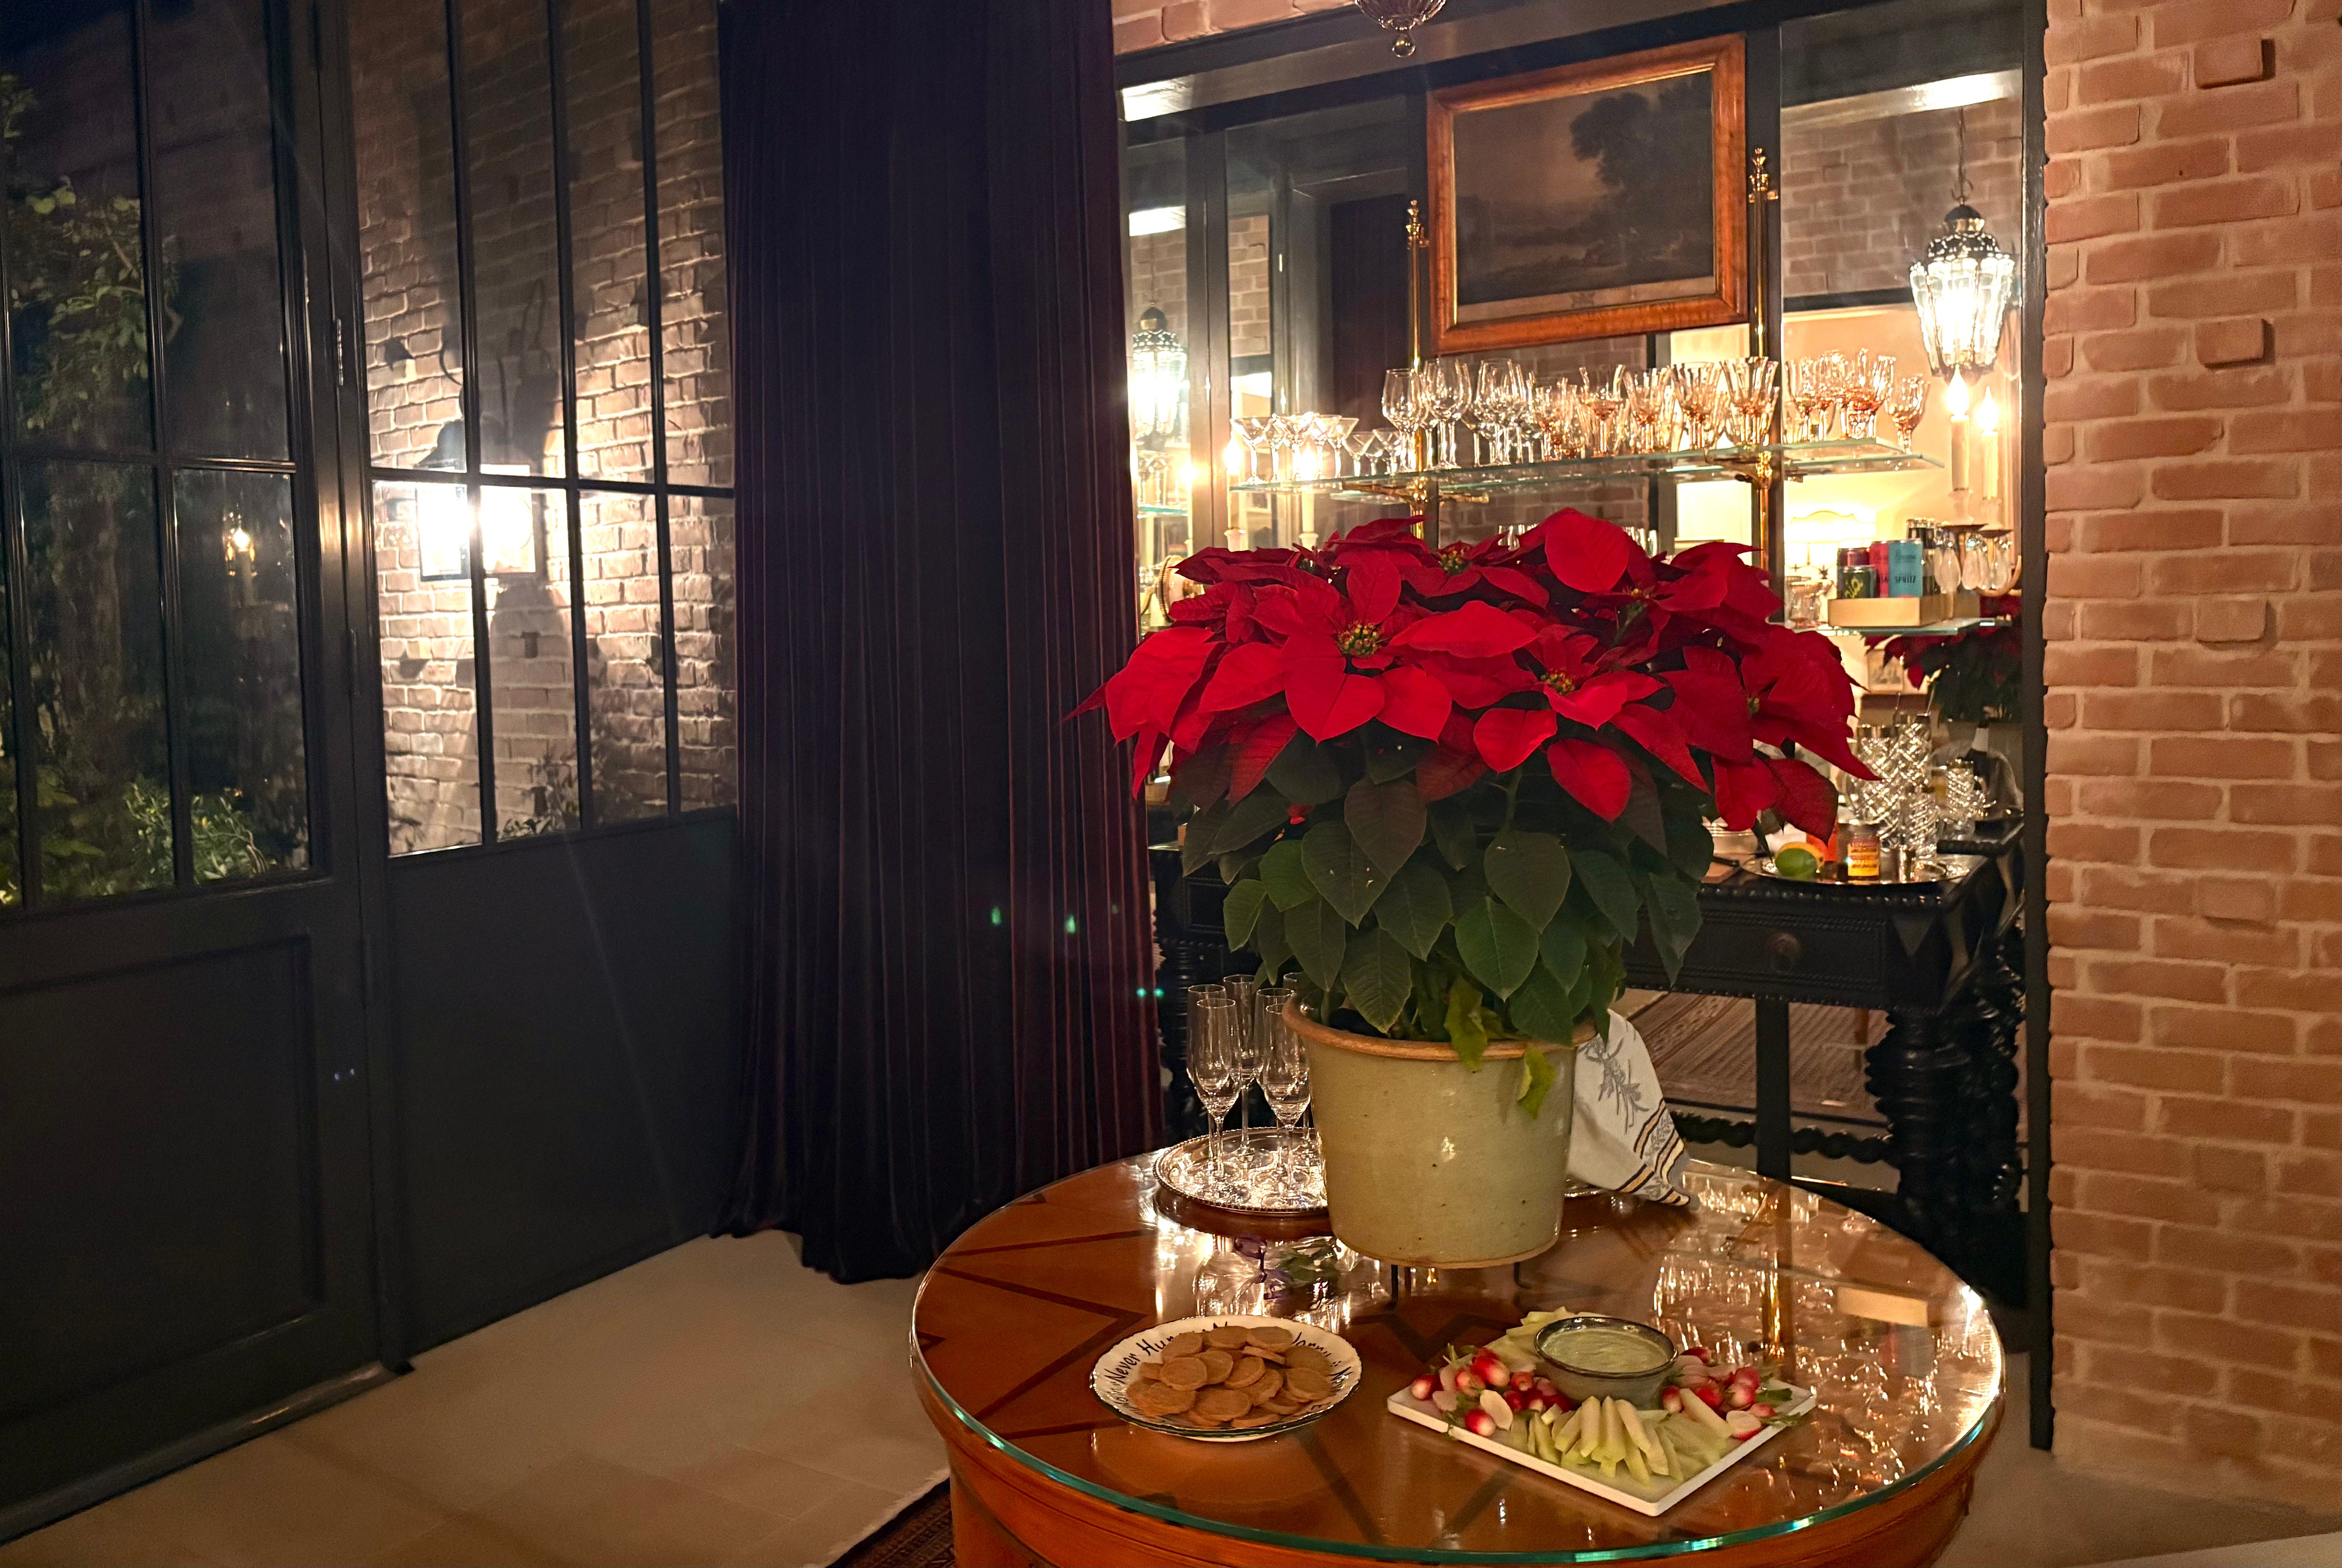
Cheese coins and vegetable dip to accompany cocktails
Dinner buffet
Roasted asparagus
Sauteed red cabbage, shallots, and spinach
Salad
Mixed lettuces with pear, blue cheese, hazelnuts and pomegranate seeds and a shallot dressing with hazelnut oil
Desert
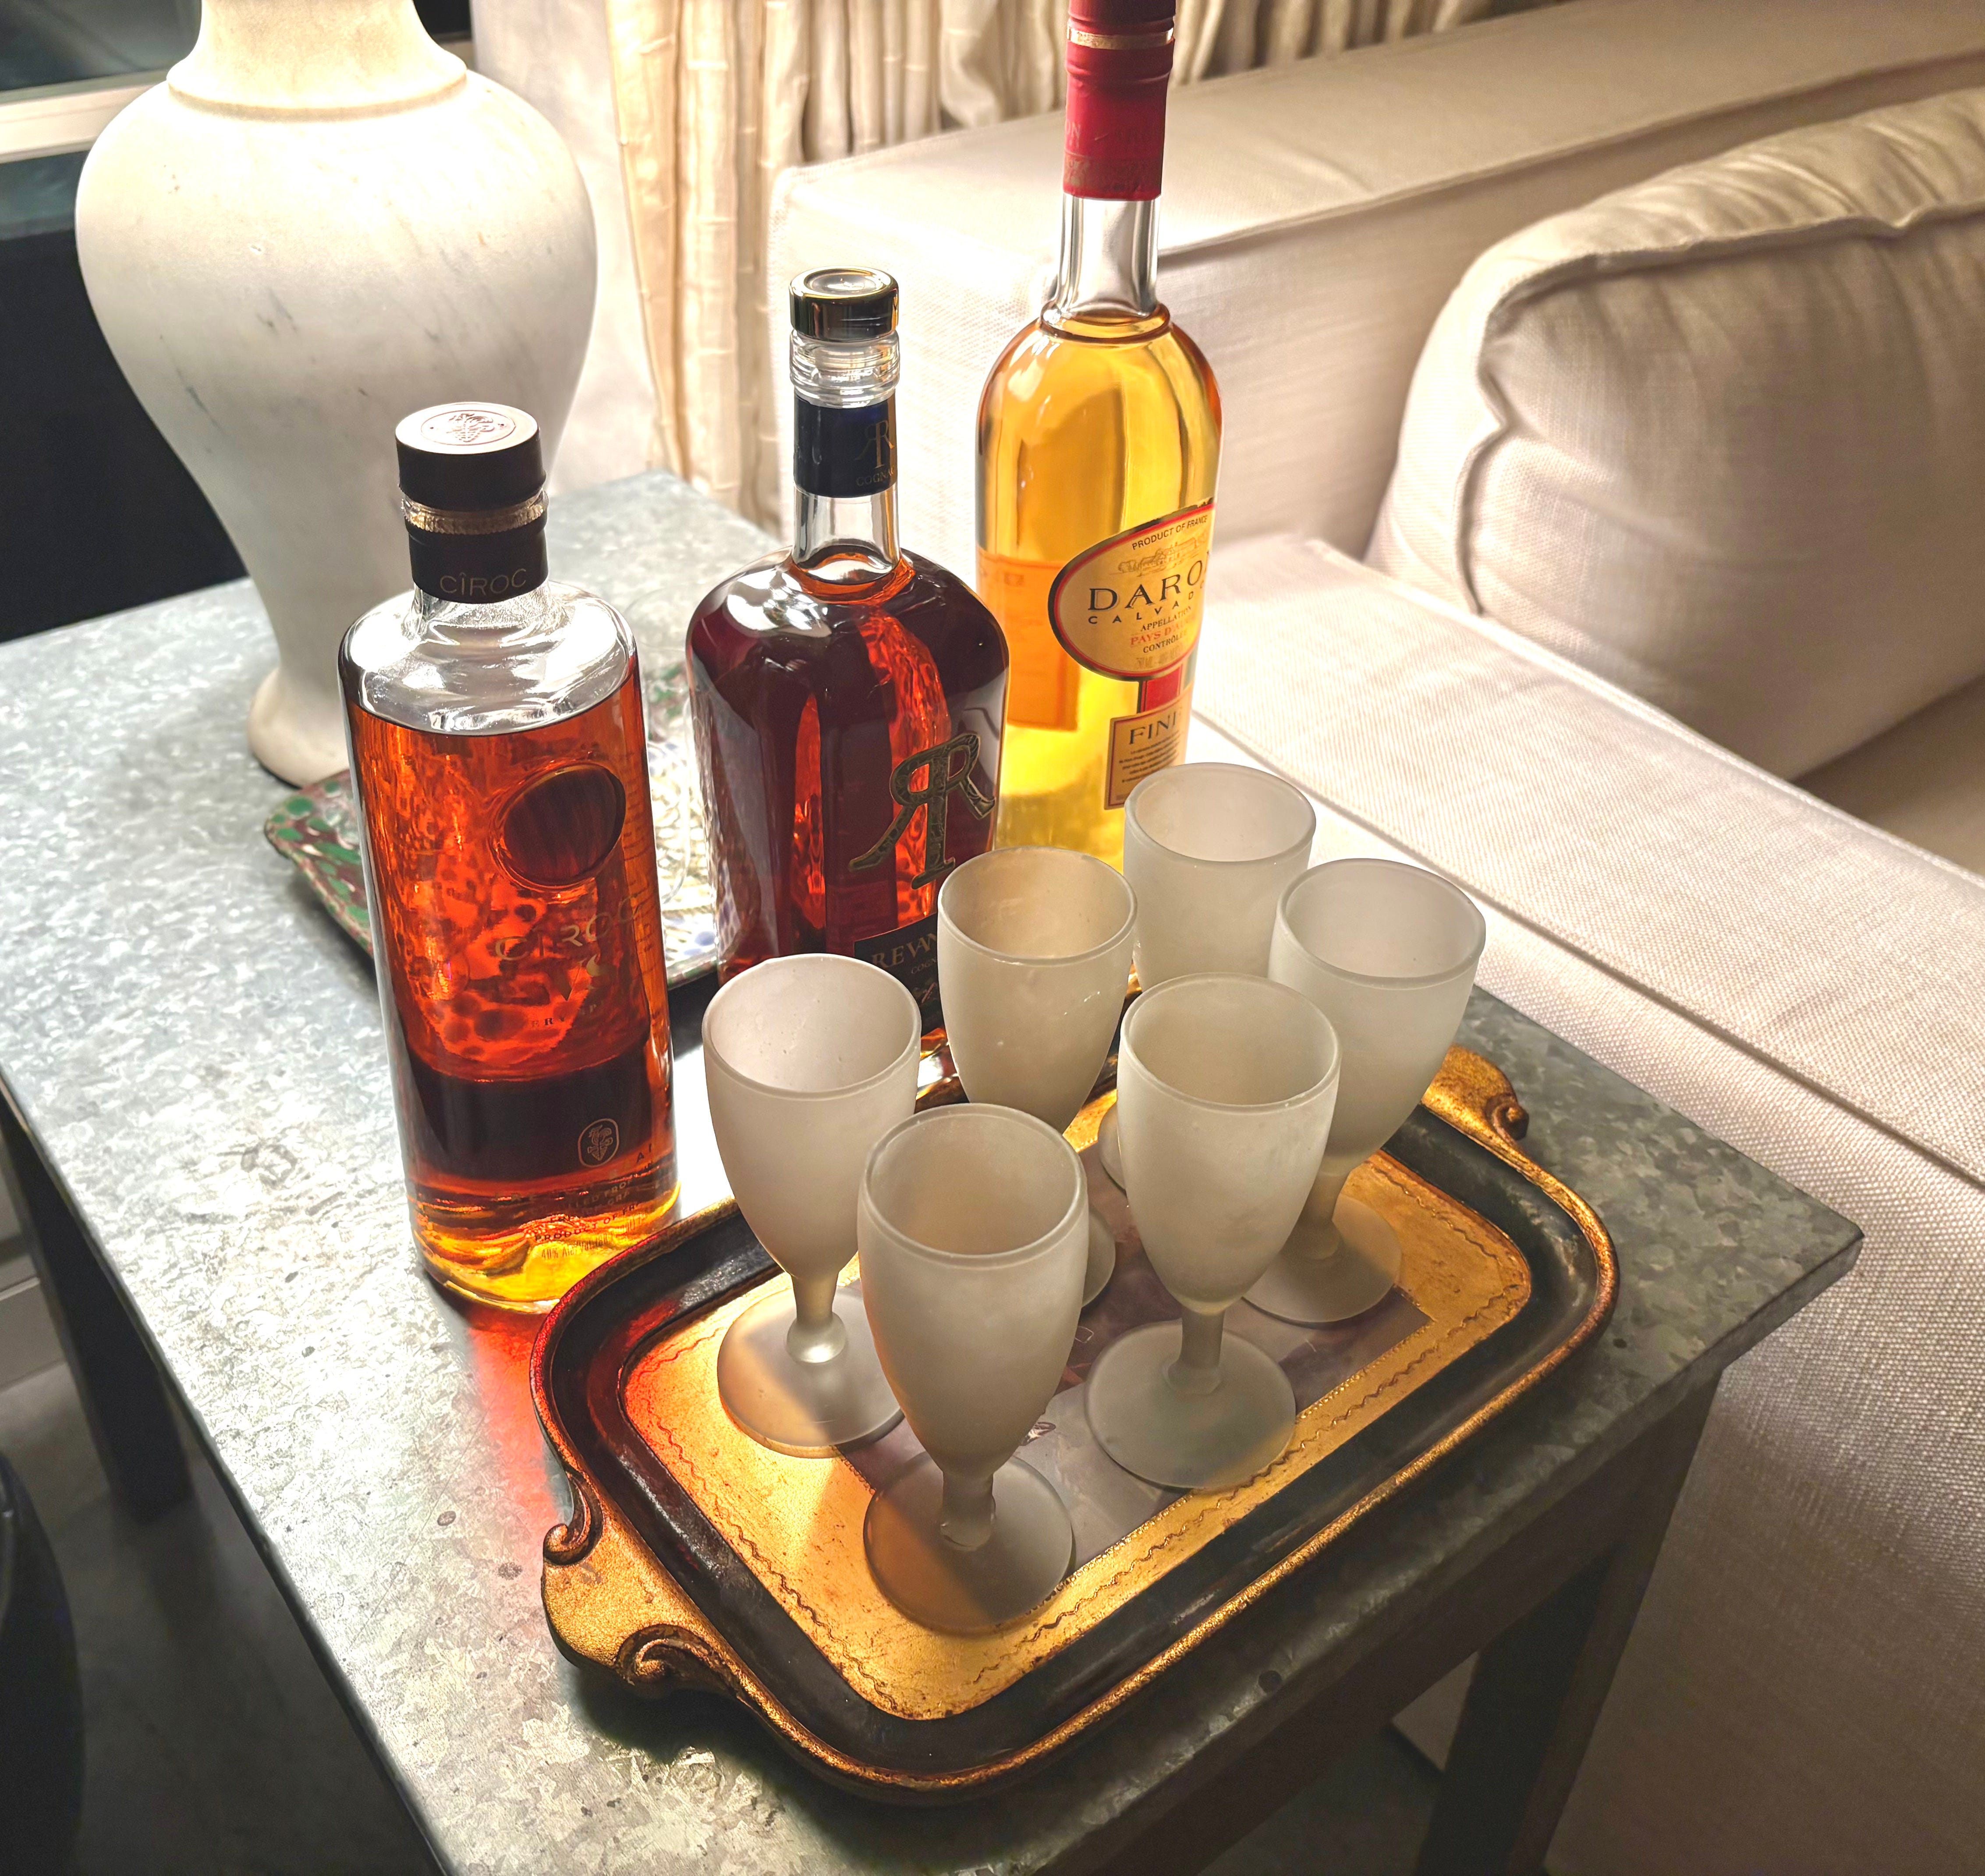
Creme brûlée with the option to enjoy port and brandy
Wine
Since we’re cutting back on drinking, we decided to have wine bottles on the table for those who wished to help themselves, and an alternative for those who wanted something different. My go-to here is iced lemon ginger tea.
So that I could enjoy the party rather than constantly rush around like a worker bee, I decided to hire a dear friend, Lori, to come help cook for a couple of hours the day before and also to serve and clean up afterward on the day of the event.
Staging The Space
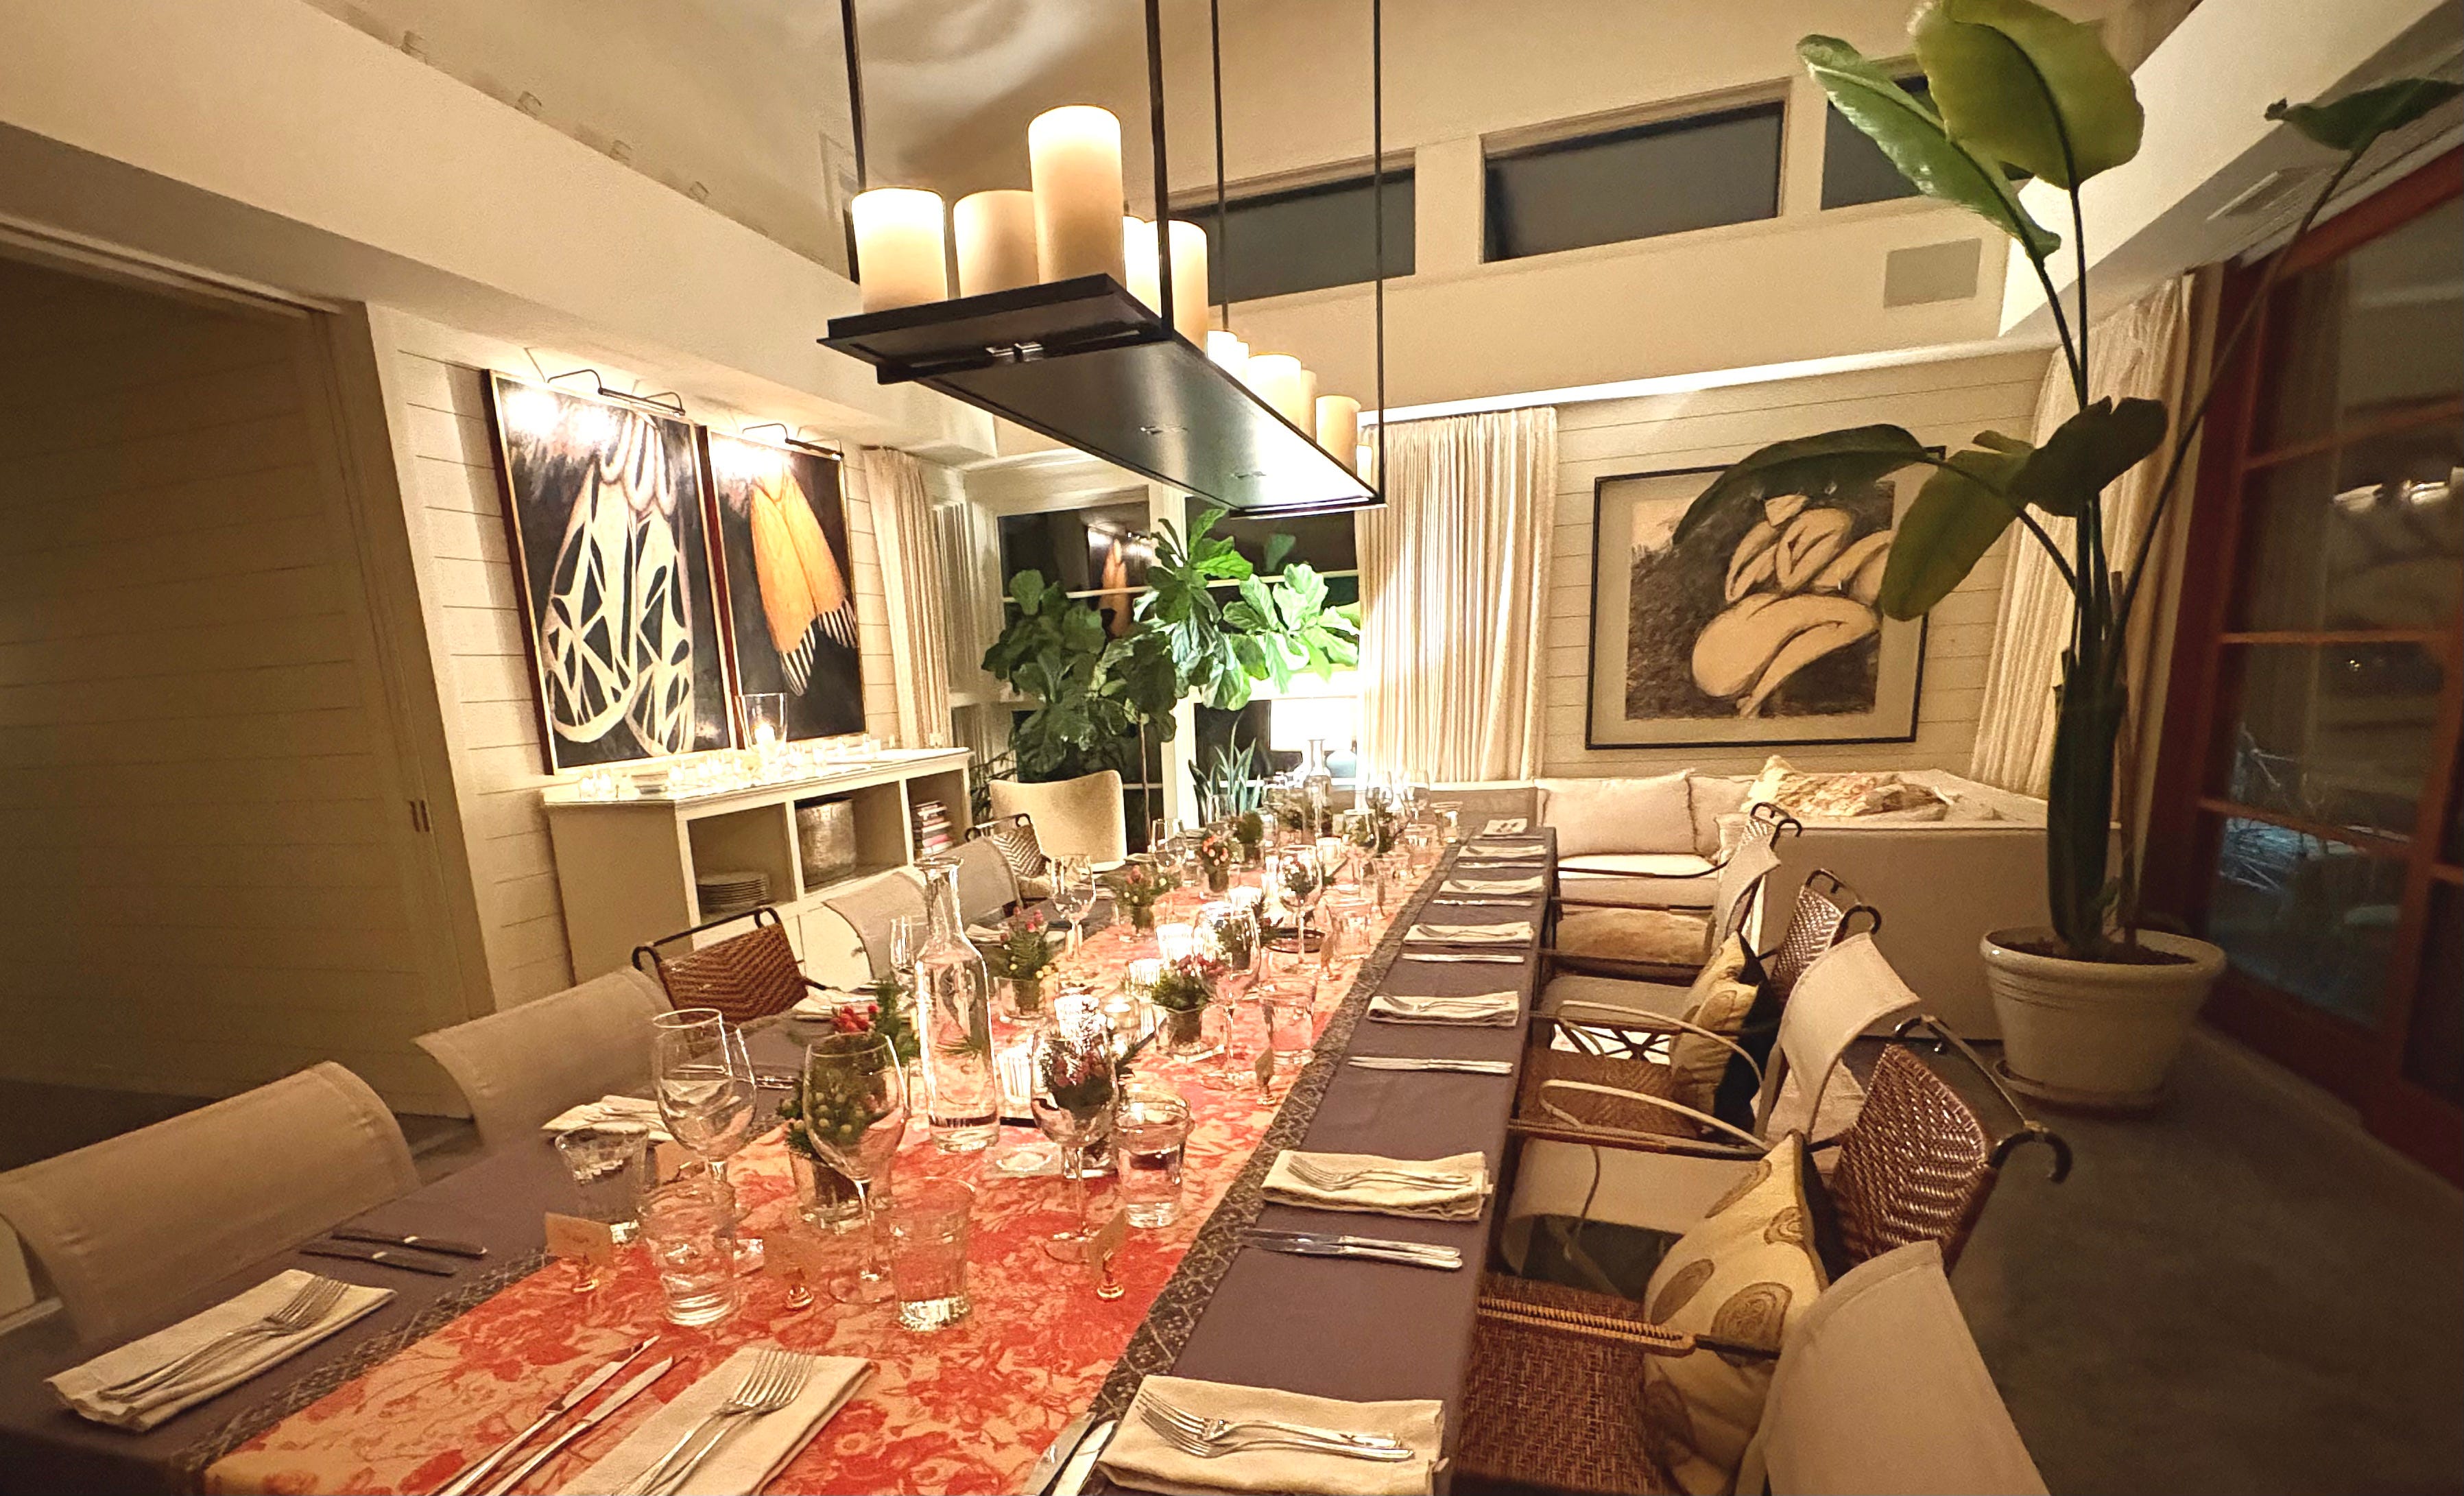
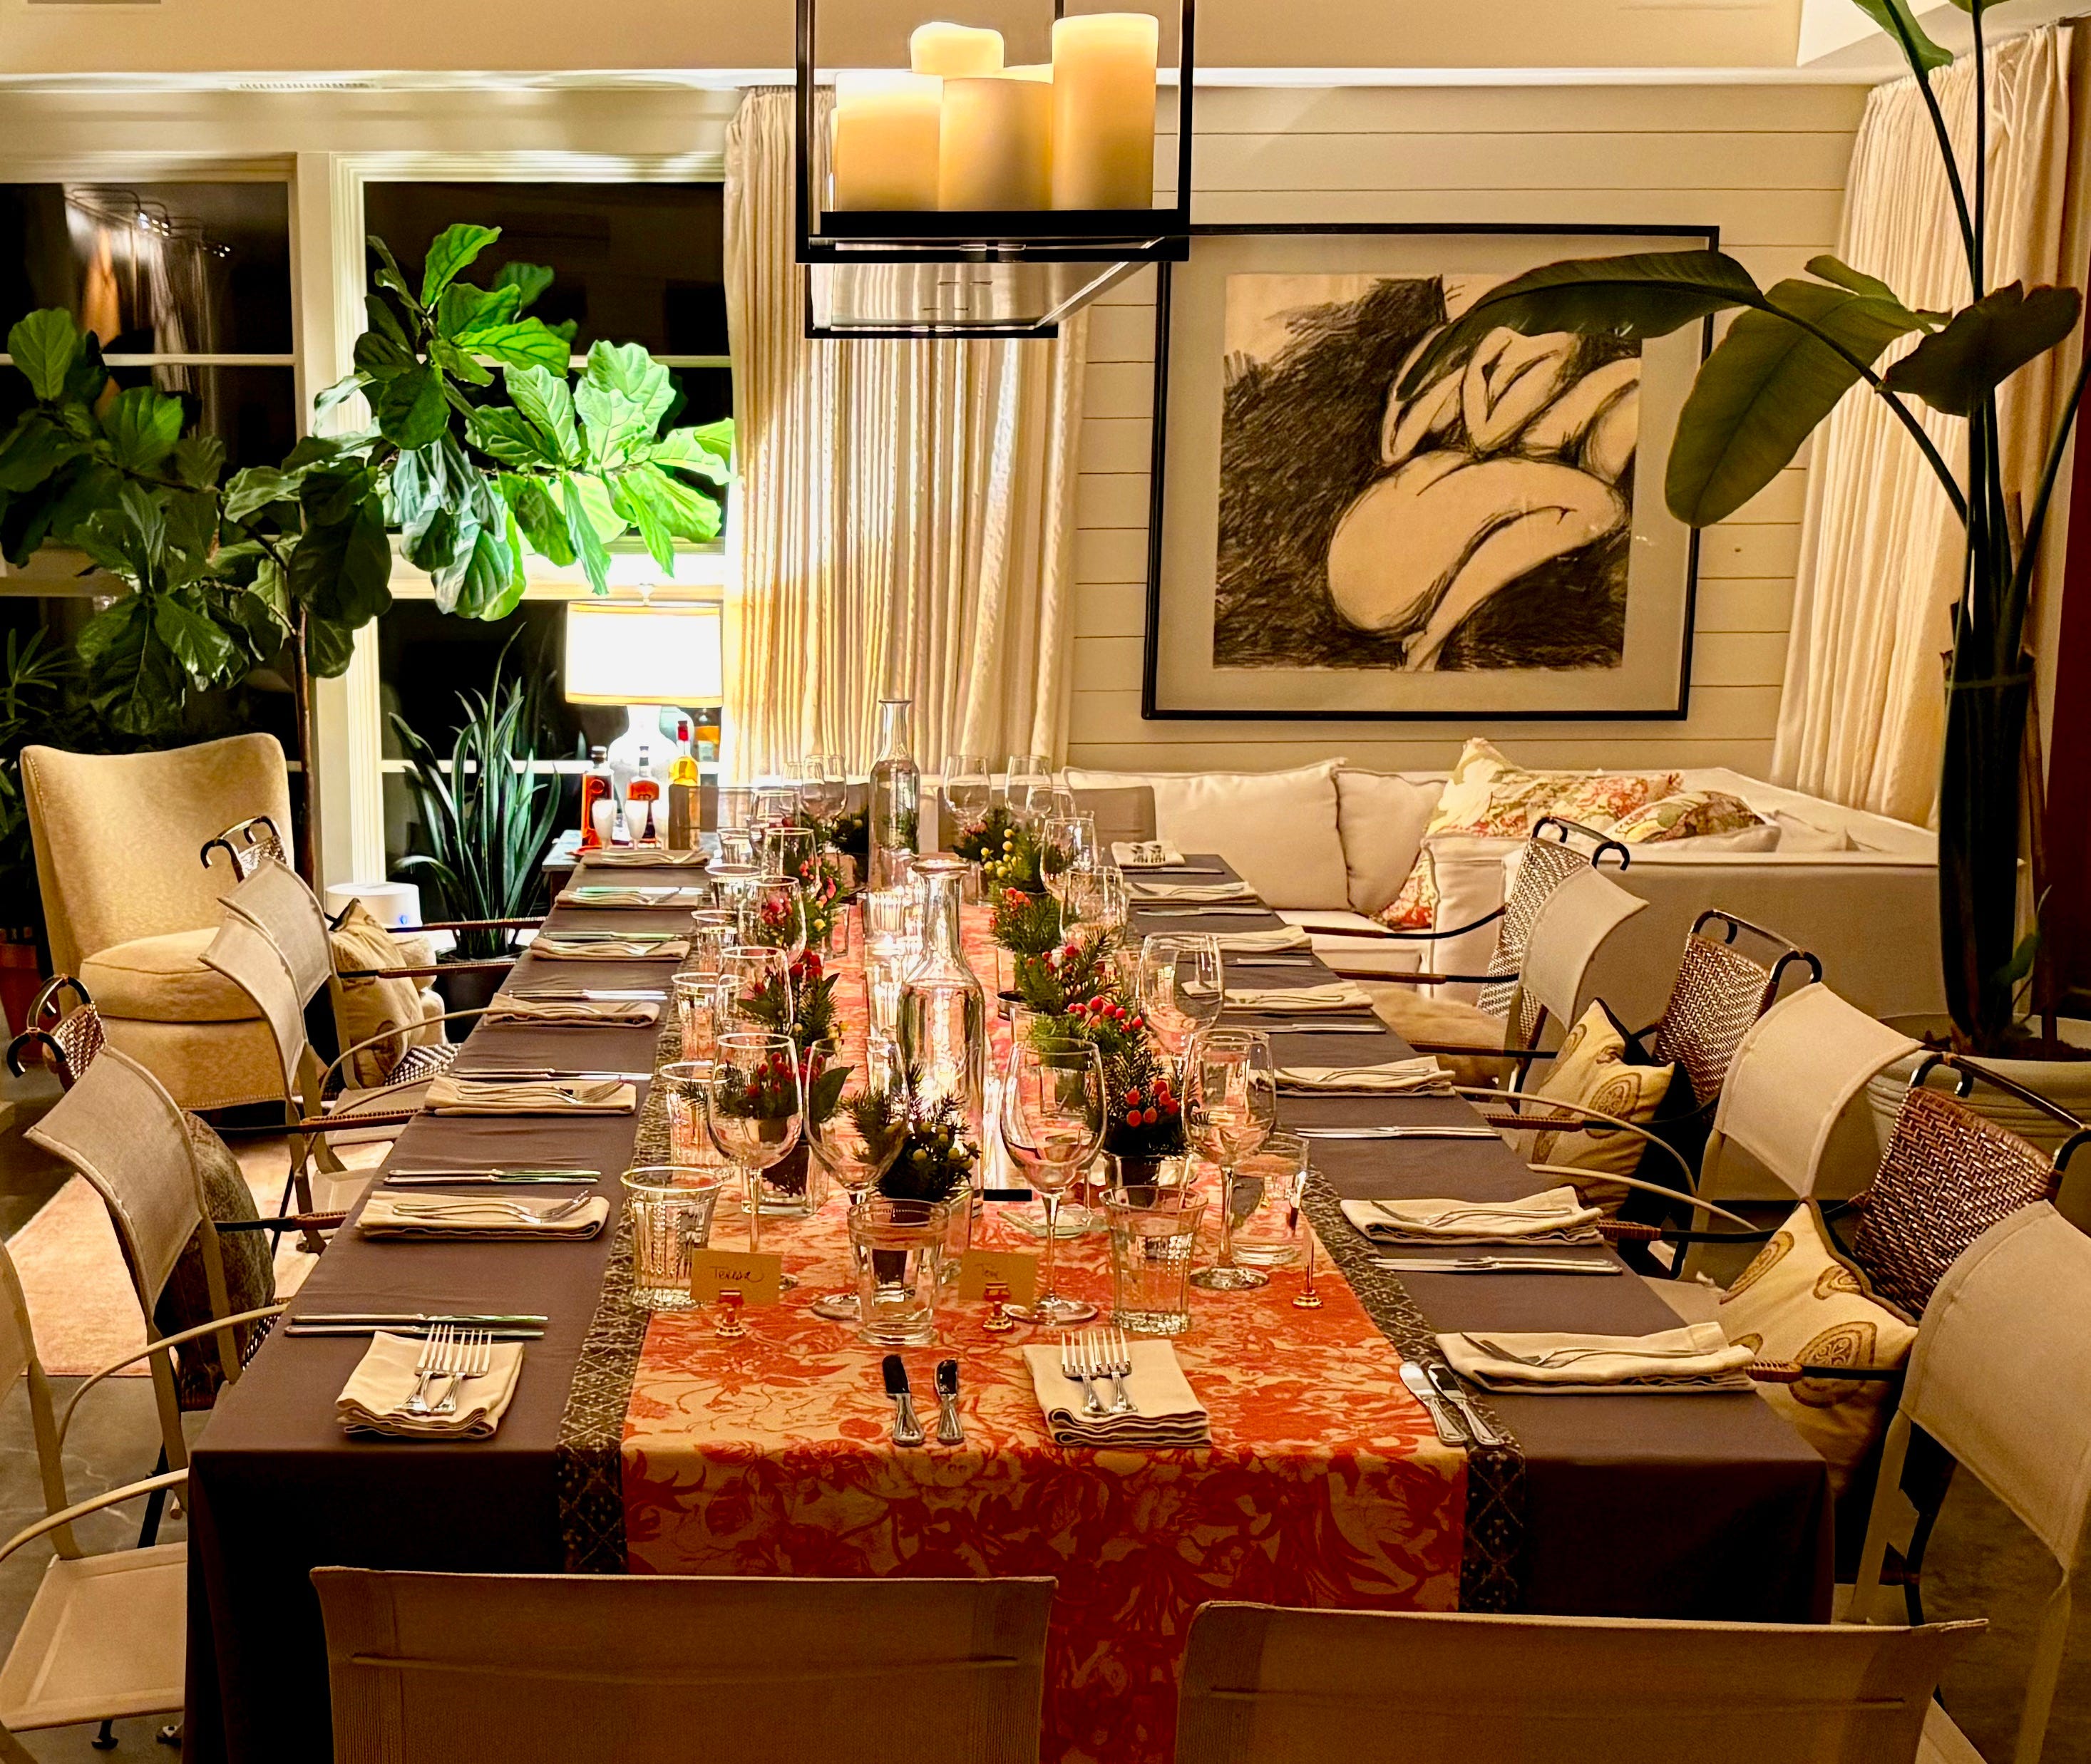
It sounds unbelievable, but it took my husband, Tom, and I almost two days to get the furniture and table set up to seat sixteen. I have three custom-made square folding tables that can scoot together to make a 16-person table. They are heavy and difficult to manage, but we got them pulled together and the unwanted furniture out of the room in a few hours.
Setting The Table
Setting the table is a project. I actually use beautiful old drapes that I had custom made from fabric I bought in London for another home as the runner. The base tablecloth is pieced together from several Williams Sonoma tablecloths in dark grey. I tuck them under the runner and I am able to give the impression that it’s one humongous tablecloth. Then I use an old ¾” thick glass shelf (again from an earlier home) that I set down the center of the table on the runner to place the candles on. The effect of this is beautiful in low light with the reflection of the candles. I basically scrounge all this together because I don’t do these dinners often enough to justify having everything custom made from scratch. And I believe it doesn’t all have to be perfect. People really only notice the general overall effect. They aren’t looking to make sure the edges of the tablecloth are the same distance from the floor all around. They are thinking about the conversation they are in the midst of. This is theatre and fun. (I once knew a very fancy lady in Washington D.C. who would entertain the press and other very fancy people, and her tables were crazy! She would throw a colored blanket over the top and add vases, dishes, etc. and because the light was low and she expected it to work, it just did!)
We got the tablecloth in place, the runner, and the glass. Then after fiddling with the candle holders to find the right ones, and insert the candles, (which took another couple of hours) we added the silverware, napkins, water glasses, and wine glasses. We worked out the seating arrangement and set out place cards for seating. I use these holders for the place cards. (They have lasted over seven years without tarnishing!) The flowers were added the day before.
Organizing Serving Platters
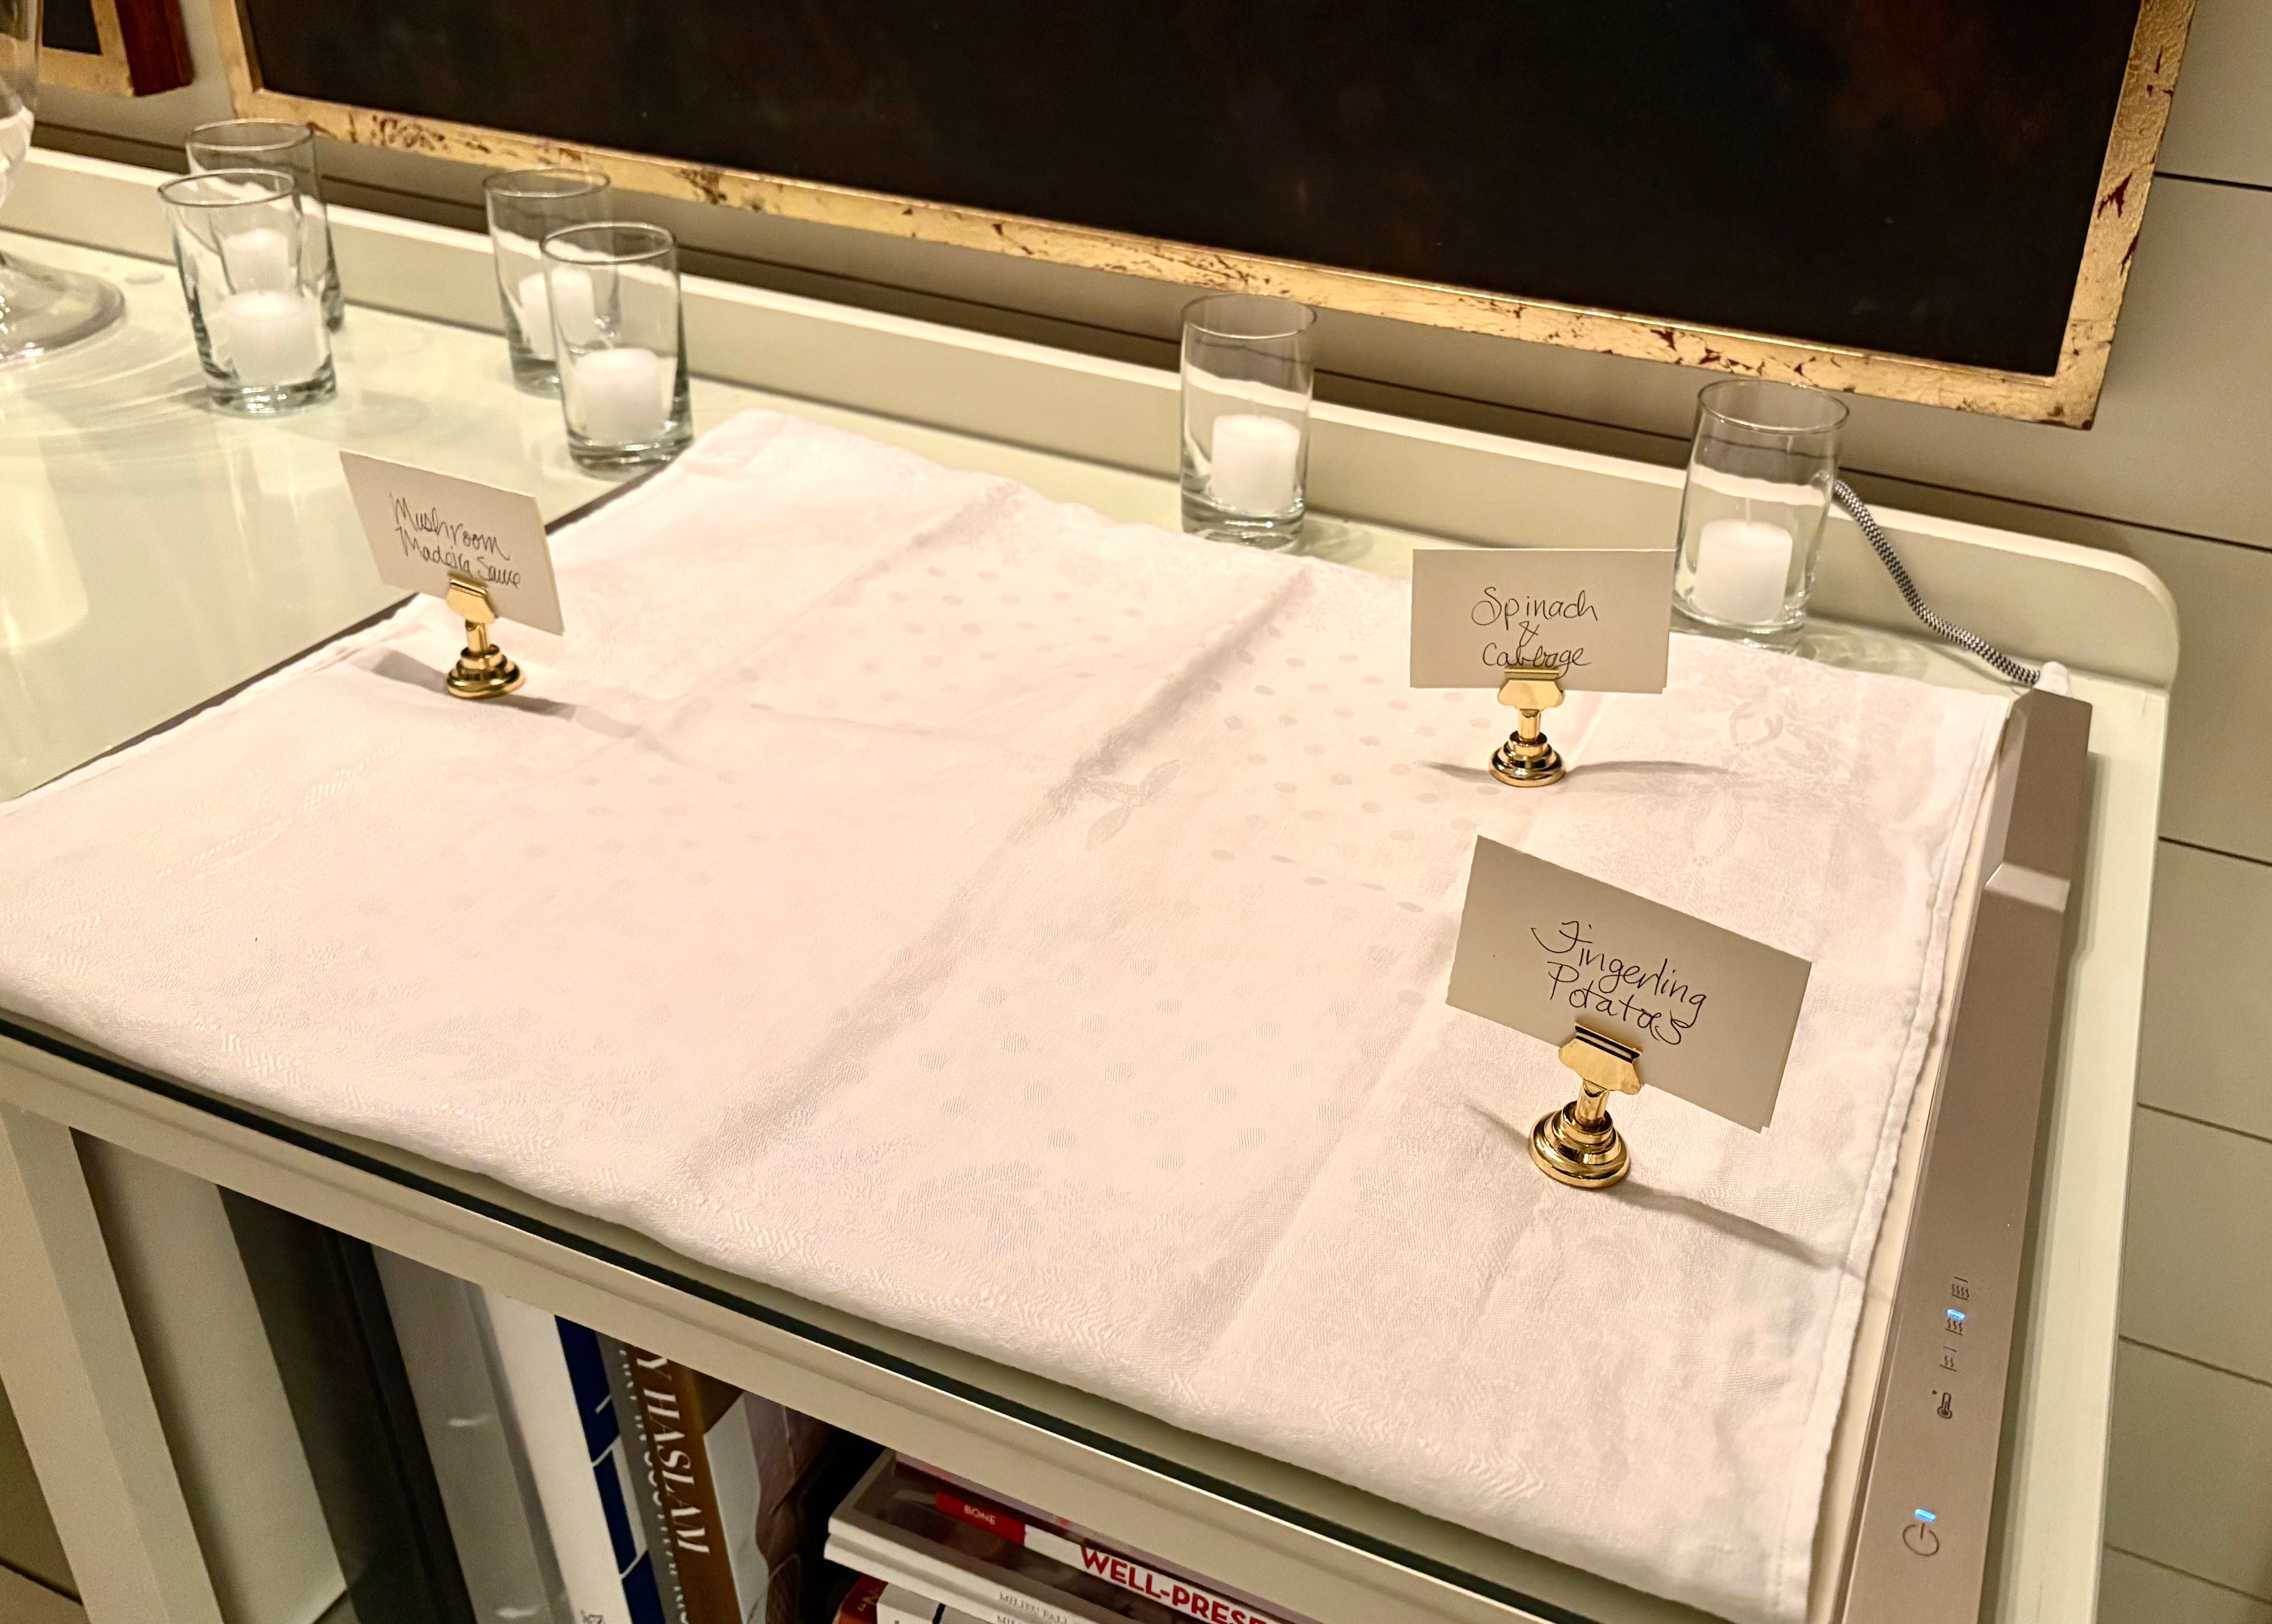
I staged the buffet with place card holders that had the names of each dish to be served. We used our wonderful flat heated mat to keep food hot. I place a pretty hand towel over this so that it’s barely noticeable. We got the mat plugged in and ready to go. I also identified the platter each dish would be served on along with the serving utensils. There is nothing more nerve-rattling than trying to sort all that out just as the food comes out of the oven!
Advance Shopping & Preparations
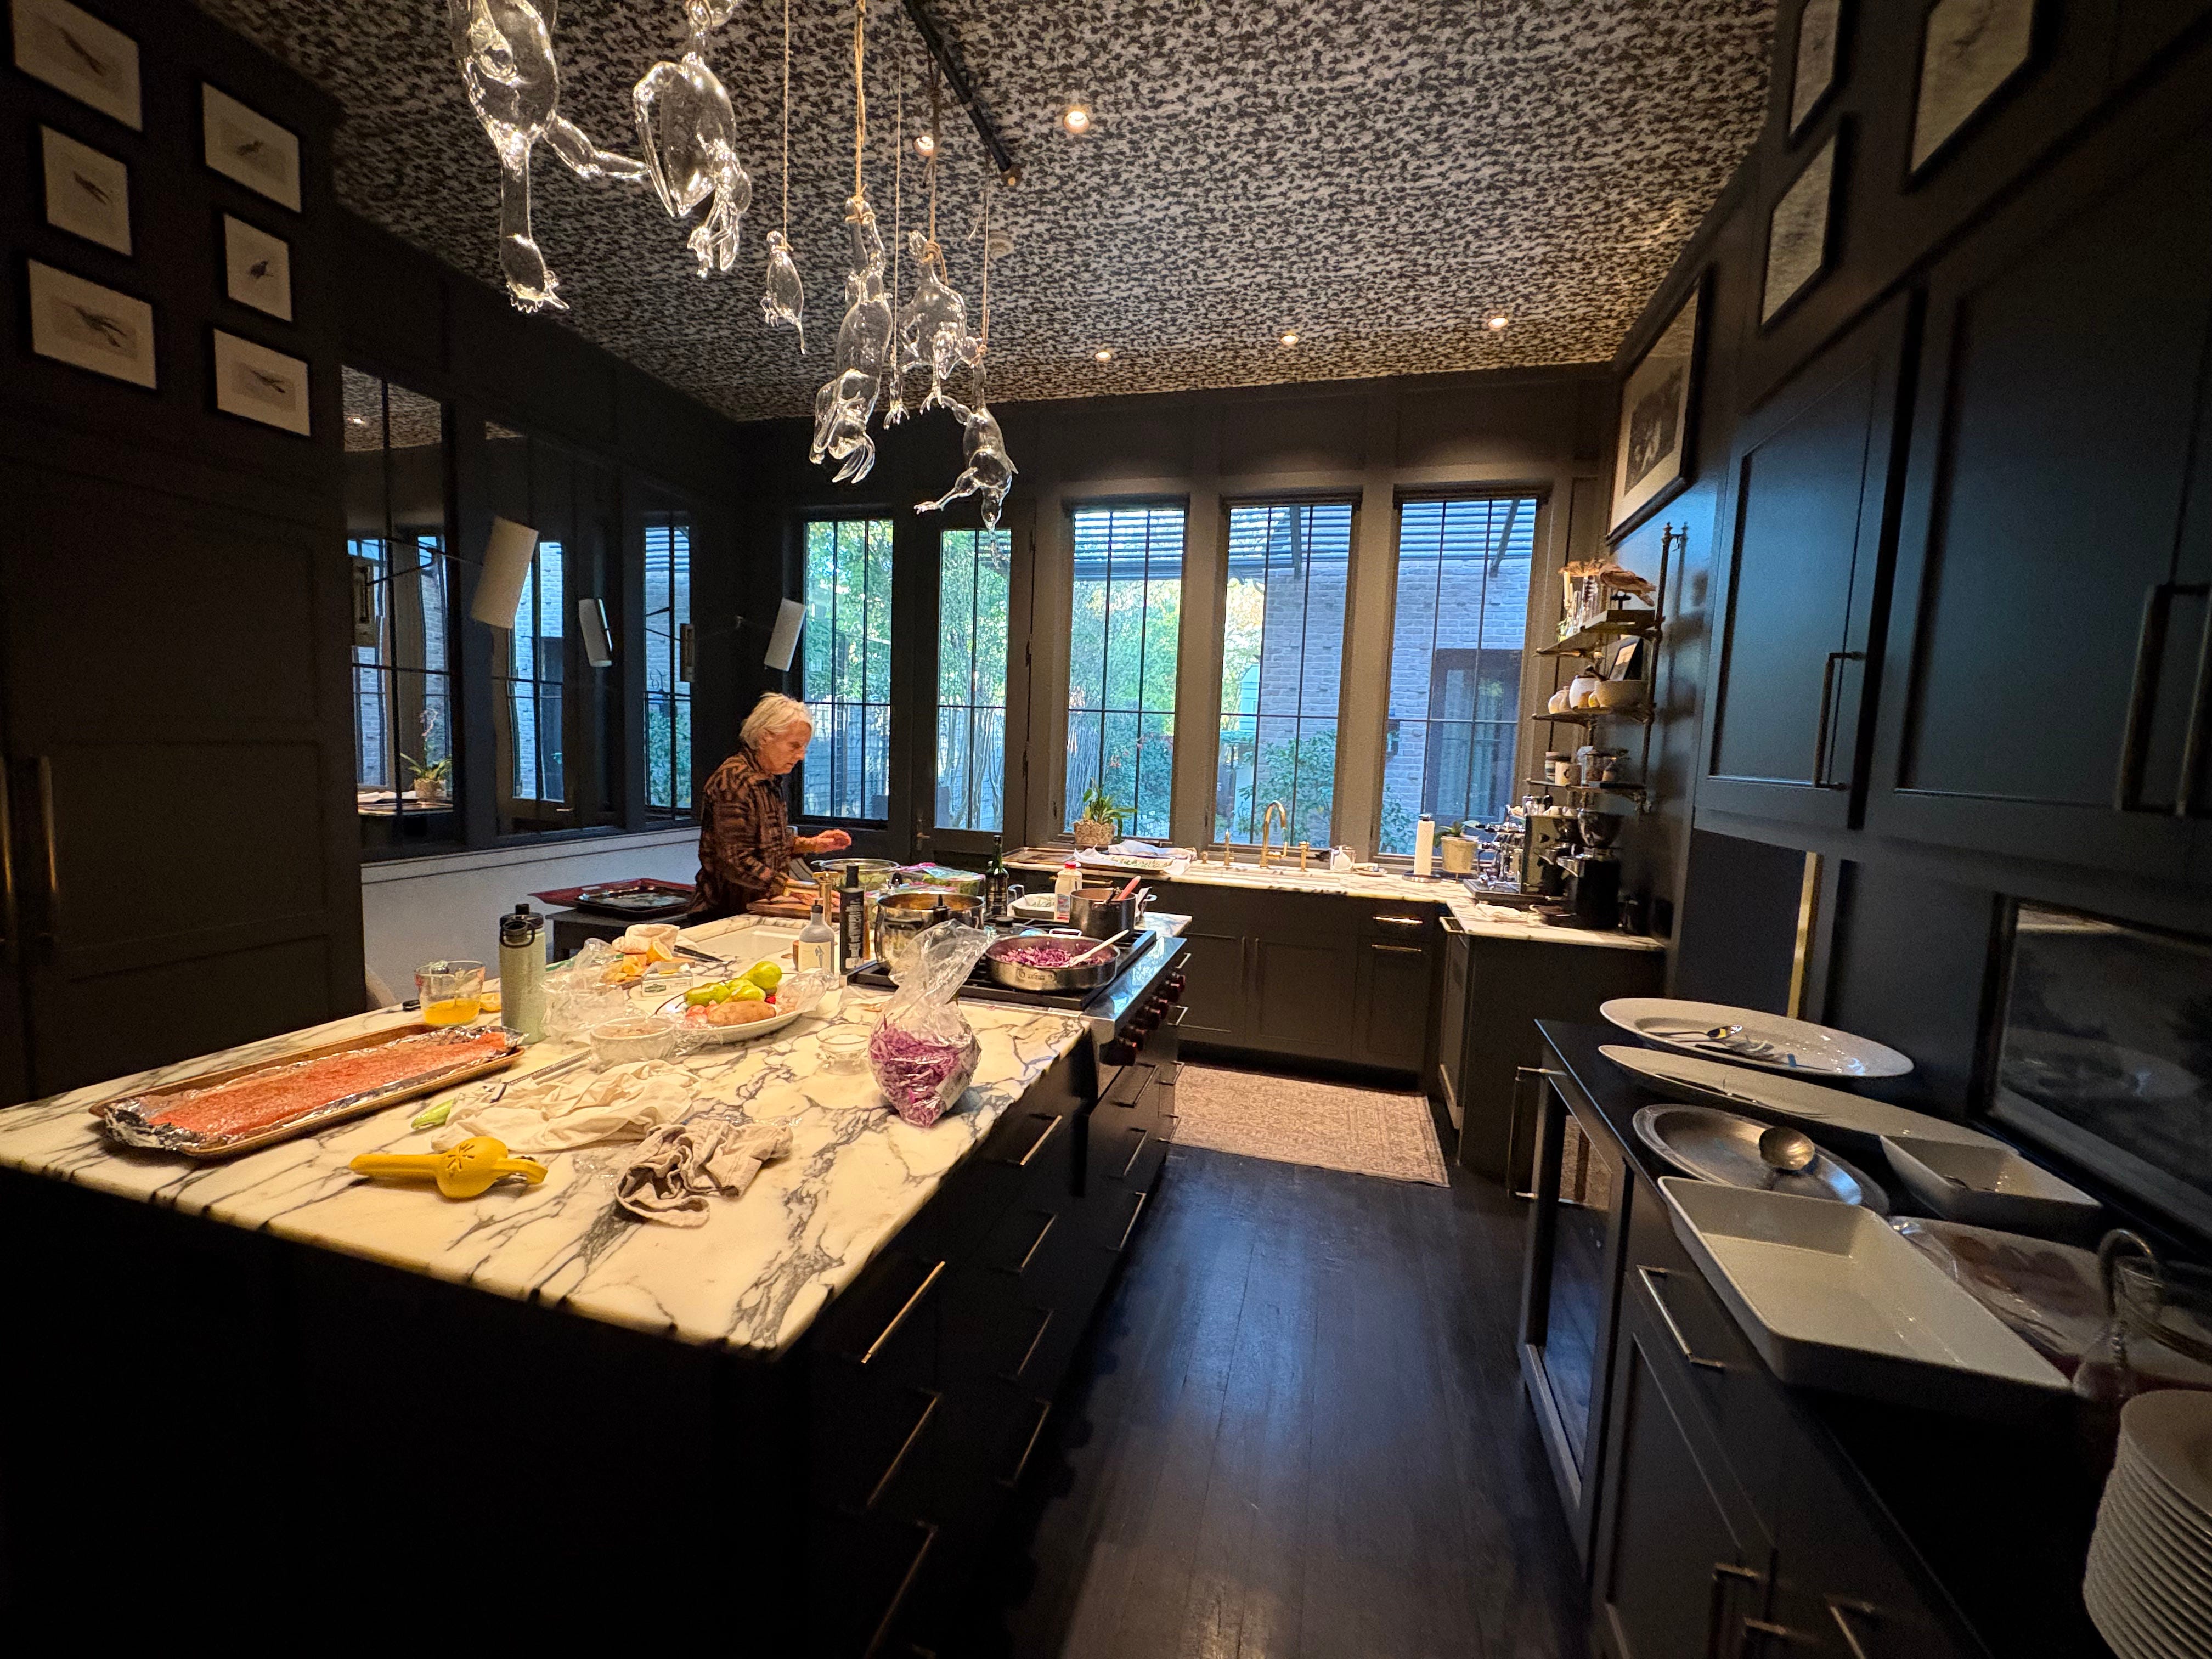
Basically, all the food that could be purchased more than two days ahead was. Everything that could be prepared more than two days ahead was. (The creme brulee and cheese coins) Anything that could be cleaned, chopped, pre-measured, or prepped ahead was. (Red cabbage was sliced, potatoes were washed, hazelnuts roasted and chopped, pomegranate seeds separated) I made sure that I had all the ingredients so there would be no panicked trips to the store. Lori and I did all the prep that was possible the day before. Then, on the day of the party, it really wasn’t too nerve rattling. I was super grateful to have a helper who would help clean up as we cooked and basically multiply my own efforts.
Cocktails Before Dinner
We received the guests in the main house. We had drinks and bites for about 45 minutes. Then, the guests were led out the back patio down a walk to the guest house where the candles were lit and the food was waiting to be served. Though we had parties like this a few times a year pre-covid, we had not done it since. Our friends aren’t used to seeing such a setup anymore, and they were actually a bit stunned when they walked into the room,.
Creating a Single Conversation for 16
The main thing that made this party special was having one conversation at the table, instead of everyone chit-chatting with the person they were seated next to. One friend, a notable and rather famous professor, took the lead on setting that expectation and kicked us off with a topic. It worked! The single conversation seems to be what everyone remembers about the party most of all. It created a wonderful shared intimacy and allowed everyone to be heard by the group.
Dinner Party Recipes
Cheese Coins
These bite-size wafers are cheesy and salty. Perfect for appetizers. The dough can be frozen ahead of time, then thawed in the refrigerator, sliced and baked the day of your event. Once baked, they keep well in a sealed container for several days.
1/2 cup of pecan pieces
1 1/2 cups flour
1/2 teaspoon dry mustard
1 teaspoon sea salt
1/4 teaspoon cayenne pepper
1 cup (4 oz.) grated cheese (Gruyere or sharp Cheddar)
1/4 cup (1 oz.) grated Parmesan
8 tablespoons cold unsalted butter cut into 1/4” pieces
1 egg yolk
2 tablespoons of cream or milk (add more as needed)
Combine dry ingredients and cheeses. Pulse the pecans in a food processor with a chopping blade until they are finely chopped but not ground to a paste. Add the flour, salt, mustard and cayenne. Pulse until everything is mixed. Add the cheeses and pulse again to combine.
Add the butter. Drop the butter into the food processor, scattering it so that it is not concentrated in one spot. Pulse until the dough resembles course crumbs and the pieces of butter are no larger than peas. Add the egg yolk and 2 tablespoons cream or milk. Pulse again until well incorporated. Test the dough by squeezing a bit between your fingers. It should clump together easily. If it is too dry to hold together, add an additional teaspoon or two of cream or milk.
Shape the dough into a log. Put the dough onto a lightly floured surface. Gather it into a ball. If it feels crumbly, then kneed it until it holds together. Then roll the dough into a long log that is about 1” in diameter. At this point, you can roll the log in plastic wrap and freeze it. Or, you can refrigerate it for at least one hour to chill prior to baking.
Slice the log into coins and bake at 325 degrees. Cut the dough into rounds about 3/16” thick. Place the coins on a baking sheet covered in Silpat or baking paper and bake in a preheated oven at 325 degrees for 15 to 20 minutes. They should be golden around the edges. Cool before serving.
Green Goddess Herb Dip
1 cup of mayonnaise
1 cup sour cream
3 anchovies
1 garlic clove, grated
1 tablespoon capers
3 tablespoons olive oil
juice of one lemon and zest from one lemon
1/4 cup packed tarragon leaves
1 cup packed fresh basil leaves
1/4 cup packed Italian parsley leaves
salt and pepper
Put all ingredients into a food processor and blend until the dip is a smooth consistent green color. Put into a bowl next to assorted veggies (endive, breakfast radishes, carrots, etc.) This is excellent left over smeared onto a sandwich or thinned with olive oil to make a salad dressing.
Herbed Beef Tenderloin with Morel Mushroom Madeira Sauce
1 whole tenderloin, room temperature
1 stick of butter, room temperature
4 garlic cloves
handful of parsley (should be about ¾ cup chopped)
2 tablespoons of fresh thyme roughly chopped
a few leaves of sage roughly chopped
1 sprig of rosemary roughly chopped
1 teaspoon of dried oregano
2 tablespoons of salt and 2 tablespoons of pepper
Sauce
1 oz. dried morel mushrooms
1 lb. fresh cremini mushrooms
2 tablespoons butter
1 cup beef stock
1 cup Madeira
1 cup whipping cream
Prep the beef
The day before you plan to cook the meat, remove it from the package. Dry it off, cut off any undesirable fatty parts and heavily salt and pepper it. Use about 1 tablespoon of salt and 1 tablespoon of pepper. Put it back in the fridge uncovered until the next day.
Early the next day take it out of the fridge. You want it warmish so that when you apply butter, the meat will not chill the butter.
Make the butter marinate
Grate or finely chop the garlic.
Roughly chop the parsley, sage and rosemary.
Add these to the soft room temperature butter along with the remainder of salt and pepper. Mash all this to a buttery paste.
Apply the marinate
Take the butter mixture (it should be the consistency of a thick hand cream) and massage it into the beef. It’s a good idea to use disposable rubber gloves for this. Work the butter mixture into all the little cracks. Make sure to get both sides. This can take a while. If your beef is too cold, the butter will stay in lumps, so you may have to apply it and come back later in the day and continue rubbing the butter in. Let the beef sit out all day (about 5 hours) with the butter mixture.
Roast
Preheat the oven to 300 degrees.
About an hour and 30 minutes before serving, place the buttery beef on a rack sitting on a roasting pan or baking sheet. Roast in the preheated oven for 60 minutes, without opening the oven door. Do not poke it and fiddle with it while it is cooking. Cook with a meat temperature probe until the internal temperature is 130 degrees. Remove the meat from the oven, cover it loosely with aluminum foil, and set aside for 30 minutes. Heat plates in the turned-off oven.
Make the sauce
(I like to do this the day before, but you can also do it while the meat is cooking.)
Soak the morel mushrooms for 30 minutes in a small bowl with 1 ½ cups of almost boiling water. Squeeze the mushrooms to extract the water and slice into pieces large enough that they are still recognizably morels: strain and reserve the soaking liquid.
Slice the fresh mushrooms 3/16’ thick. Melt the 2 tablespoons butter in a saucepan over medium heat, add the fresh mushrooms and saute until the liquid is released and mostly evaporated. Add the morels and cook them together for a few minutes. Pour in the strained mushroom soaking liquid and the stock. Cook until reduced to about 1 cup of liquid. Add the Madeira and reduce again to about 1 ½ cups. Pour in half the cream, bring to a boil, and reduce slightly; add the rest of the cream and reduce again to about 2 cups. Season with salt and pepper. This will need salt. Be sure to use enough. Add more cream or Madeira to taste.
Serve
Carve the beef into slices about ½” thick. Serve on warm plates with a spoonful or two of sauce. Then pass the rest of the sauce around.
Serve with scallop potatoes.
Roast Salmon with Lemon, Dill and Caper Sauce
For larger dinners, I often serve the whole side of salmon. However, you can also cook smaller pieces of this fish the same way. It’s important to have the person at the fish counter remove the bones. This is one of those easy winning dishes that anyone can be successful with!
4 tablespoons butter
1/4 cup dry white wine
1 clove garlic
zest and juice from one lemon
salt and pepper
pinch of cayenne pepper
fresh dill
Preheat oven to 400 degrees. Take salmon out of the refrigerator about 30 minutes prior to cooking and allow it to come to room temperature. (This will keep the butter from congealing the minute it is added to the fish.)
Thinly slice the garlic and add it to the butter in small bowl. Melt the butter with garlic in the microwave.
Prepare baking dish. The dish should be small enough to contain the juices around the salmon. If the dish is too large, cover it in foil and scrunch the foil so that juices are well contained around the fish and do not spread out away from the fish. Butter the surface the fish will rest on so that it will not stick. Then place the salmon on top of the buttered surface.
Pour the white wine and lemon juice over the salmon.
Pour melted butter with garlic bits over the salmon. Sprinkle lemon zest over the salmon.
Salt and pepper the salmon. Add a dusting of cayenne and sprinkle with fresh dill.
Put the salmon in the oven. Bake until it is cooked on the outside, but still quite rare in the center. The timing will depend on the thickness of your particular piece. After 20 minutes, take the dish out and check for doneness. Continue to check at least every 5 minutes after this. Do not overcook your salmon. (I find that when tiny simmering bubbles start to form around the pool of white wine and butter, it’s usually done. It’s best to err on undercooking salmon. You can always pop it back for a few minutes, but you cannot undo overcooking! As soon as the salmon breaks apart in flakes, it is done. Do not judge doneness by color!)
Transfer the salmon to a serving platter and dust with more fresh dill. Surround it with lemon slices, sautéed tomatos or roasted asparagus spears.
For the lemon, dill and caper sauce, whisk together:
1 cup creme fraiche
2 tablespoons capers
2 tablespoons lemon juice
zest of a lemon
dash of tabasco sauce
1 tablespoon fresh dill, chopped
Fingerling potatoes with butter and chives
The fine tuning of this easy recipe will depend on the size of your fingerling potatos. In this case, mine were about 1 1/2” long and 3/4” wide. You can also use this method with small red new potatos or small yukon gold. These are beautiful surrounding a large piece of beef or a large filet of salmon.
golden fingerling potatoes (estimate about 3 per person)
large pot of water: enough to cover the potatoes by at least 3”
butter: enough to evenly coat all the potatoes
flakey sea salt and pepper
finely chopped chives to taste
Put potatoes into a large pot of cold water. Bring to a boil and let them boil for 12 minutes without a lid. After 12 minutes, turn off heat and put a lid on the pot. Let them sit in the hot water for 12 minutes. Then drain the potatoes and toss them in butter so they are evenly coated. Add pepper, flakey salt and finely chopped chives. Keep warm until served.
Creme brûlée
1 vanilla bean
3 2/3 cups heavy cream
3/4 cup milk
8 egg yolks
3/4 cup caster sugar
brown demerara sugar or regular brown sugar for topping
berries and fresh mint leaves to garnish
Put the cream and milk into a saucepan on the stovetop at medium heat. Split the vanilla bean in half lengthwise and scrape out all the seeds. Carefully put the seeds into the milk, along with the pod. Heat the cream and vanilla until the cream is steaming or very gently simmering on the edges. Do not let it boil. Let it simmer or steam for 10 minutes. Turn off the heat, cover the pot, and let the mixture steep. It should steep for at least 30 minutes. I like to let it steep overnight in the refrigerator for maximum vanilla infusion, but that is optional. Once it is cooled, it’s ready to use.
Beat the egg yolks with 1/2 cup of sugar until just pale yellow and thick. No need to overdo this. You don’t want frothy eggs.
Strain the cooled cream mixture into the egg mixture, removing the vanilla pod. Mix well.
Pour the mixture into 4 oz. ramekins. Set the ramekins into a large baking dish and pour boiling hot water around them to within about an inch of the top of the cups. Place the dish into a preheated oven at 300 degrees. Bake until the mixture just sets. It should still be slightly wobbly but not liquid. This will take about 35 to 40 minutes. When done, remove from the oven and cool to room temperature. Cover the cups with plastic wrap and refrigerate until well chilled. The consistency sets up very well if you can let them rest overnight.
Just before you serve these, sprinkle the tops of each custard cup with a thin even layer of sugar. (The demerara sugar has larger crystals than caster sugar and produces a crunchier topping.) You can then set the cups into the broiler so that the sugar bubbles and browns, or a much easier method is to use a Bernzomatic torch to caramelize the sugar. I love to use my torch, but you have to keep it moving around to avoid burning the sugar. After the sugar bubbles and turns dark brown, it is ready. Let your cups cool for a few minutes before serving. Garnish with berries and mint.